Programming With Electronics
Content
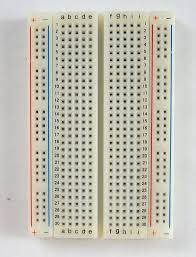
For this unit, we explored circuits and programming electronics. First, we used alligator clips, batteries, and lightbulbs to figure out how circuits worked. After that, we used actual breadboards. The breadboards looked like this:
For this unit, we explored circuits and programming electronics. First, we used alligator clips, batteries, and lightbulbs to figure out how circuits worked. After that, we used actual breadboards. The breadboards looked like this:
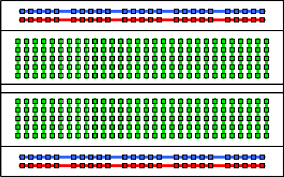
This diagram shows the connections of the breadboard.
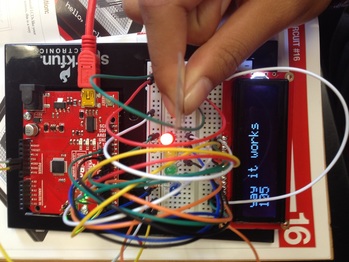
After a while, we used an Arduino kit. The Arduino kit had an instruction pamphlet that we used to follow along and learn how to do many things: lighting up multiple LEDs, using a buzzer, and use a a motor. Then, we would use what we learned from the Arduino kit to make our own little electronic show. We had four LEDs lighting up while lyrics to a song appeared on a screen. We found out that in order for the circuits to work at the same time, we had to upload the part that made the LCD screen light up first before loading our LED lights in.
Physics Concepts
Circuit: A complete loop of conductive material from one end of the power source to the other. Our Arduino board is a circuit.
Current: Measured by ammeter in amps. Described as the flow of electricity.
Voltage: Measured by voltmeter in volts. Described as the push of electricity, is also the potential energy difference across a resistor.
Ohm's Law: Voltage = Current x Resistance
Series circuits: Draws less electricity because each additional bulb is extra resistance. Voltage changes, but current remains the same throughout. Series circuits are dependent.
Parallel circuits: Draws more electricity because as the number of bulbs increases, the resistance goes down. Parallel circuits are independent.
Reflection
This project was hard for me because it was hard to understand how and why the circuits worked. It was a more challenging project for me. I had very little experience with electronics so this unit was something completely new. I definitely think that our board in the end could have been more improved. I thought that we could have delved deeper and learn how to adjust the LED lights. I also thought that we could have asked for more help. I think that if I had asked for help earlier, I would have been able to understand better. However following along the Arduino book and successfully completing a circuit was very fun. Two peaks were figuring out the Arduino circuits and finally understanding the circuits. Two pits were when we struggled with the breadboard in the beginning and when we couldn't figure out how to combine the circuits. I found out that you have to be very patient when working with breadboards because one little thing can be disconnected; the whole thing won't work. I will continue to improve in pushing myself.
This project was hard for me because it was hard to understand how and why the circuits worked. It was a more challenging project for me. I had very little experience with electronics so this unit was something completely new. I definitely think that our board in the end could have been more improved. I thought that we could have delved deeper and learn how to adjust the LED lights. I also thought that we could have asked for more help. I think that if I had asked for help earlier, I would have been able to understand better. However following along the Arduino book and successfully completing a circuit was very fun. Two peaks were figuring out the Arduino circuits and finally understanding the circuits. Two pits were when we struggled with the breadboard in the beginning and when we couldn't figure out how to combine the circuits. I found out that you have to be very patient when working with breadboards because one little thing can be disconnected; the whole thing won't work. I will continue to improve in pushing myself.
